COMIT goes Testnet

Life is life
when we all give the power
we all give the best
every minute of an hour
don't think about a rest— Opus
After months of hard work we are proud to present a live testnet version of COMIT. The description below gives you step-by-step guide of how to setup the COMIT Node daemon (cnd) on your machine and do a first swap against Bobtimus: an automated swapping bot on our side. He currently supports Bitcoin and Ether but will be extended in the future.
Phase 1: Setup
In order to achieve an atomic swap between Bitcoin and Ethereum on testnet you need the following components running:
- A COMIT Node currently consists of two parts:
cnd: The COMIT Node daemon (cnd) that implements the COMIT protocol.btsieve: A blockchain client monitoring tool that allows the cnd to connect to the Ethereum and Bitcoin client.
- An Ethereum
parityclient connected to theropstentestnet. - A Bitcoin
bitcoindclient connected totestnet3.
Download cnd (COMIT Node daemon) and btsieve:
Have a look at the readme in our repository for an up-to-date description (this blog post might get outdated). If your build environment is already setup, all you need to do is follow the steps under build & run:
- Clone the comit-rs repository.
- Put a default config file into
~/.config/comit/btsieve.tomlor pass--config <config_file>. - Start a bitcoin testnet node (port to be set according to btsieve configuration). We provide a command for running bitcoind in a docker container in the appendix.
- Start an ethereum ropsten node (port to be set according to btsieve configuration). We provide a command for running parity in a docker container in the appendix.
- Startup btsieve:
- Startup cnd:
If the [web_gui] section is specified in the configuration the current release of the user interface comit-i will be served by cnd once it has started up (defaults to http://localhost:8080).
7. Congratulations, your cnd should be up and running.
Take a break and grab a coffee or a beer, the blockchains will take some time to sync.
8. Post your selfie on twitter: #connectalltheblockchains.
Get test coins
In order to swap assets you first need some coins, so if you don't have testnet coins yet we recommend using a coin faucet to get some.
Ethereum:
We recommend using Metamask for the sake of this demo as we have built-in support for Metamask in comit-i. However, if you are an advanced user, using web3 and a cli works perfectly fine as well.
- Install Metamask: https://metamask.io/
- Get ropsten Ether from https://faucet.metamask.io/
Testnet Bitcoin
For the sake of this demo, we recommend using bitcoind-cli. A helpful collection of API documentation can be found here but the needed commands are rather limited.
- To simplify further commands if you are using the Docker image, you can create a shell command alias:
- Get a new address using bitcoin-cli:
- Get testnet bitcoin from an online faucet, e.g. https://testnet-faucet.mempool.co/
Phase 2: ???
Phase 3: Profit
Now that you have all the components running and you have some tests coins we can actually do a swap! Fortunately cnd includes a user interface called comit-i that we can now use to do a swap against our automated swapping bot.
How to use comit-i
- Open comit-i in the browser: http//localhost:8080
- Register protocol handler for COMIT links (tested on Chrome: Version 75.0.3770.142):
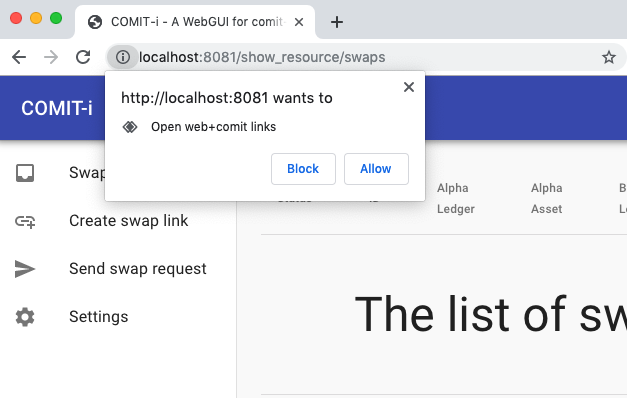 ;
; - Check on Twitter for the latest offer from @COMITBobtimus and click on a COMIT link. Your browser should automatically forward to the link landing page.
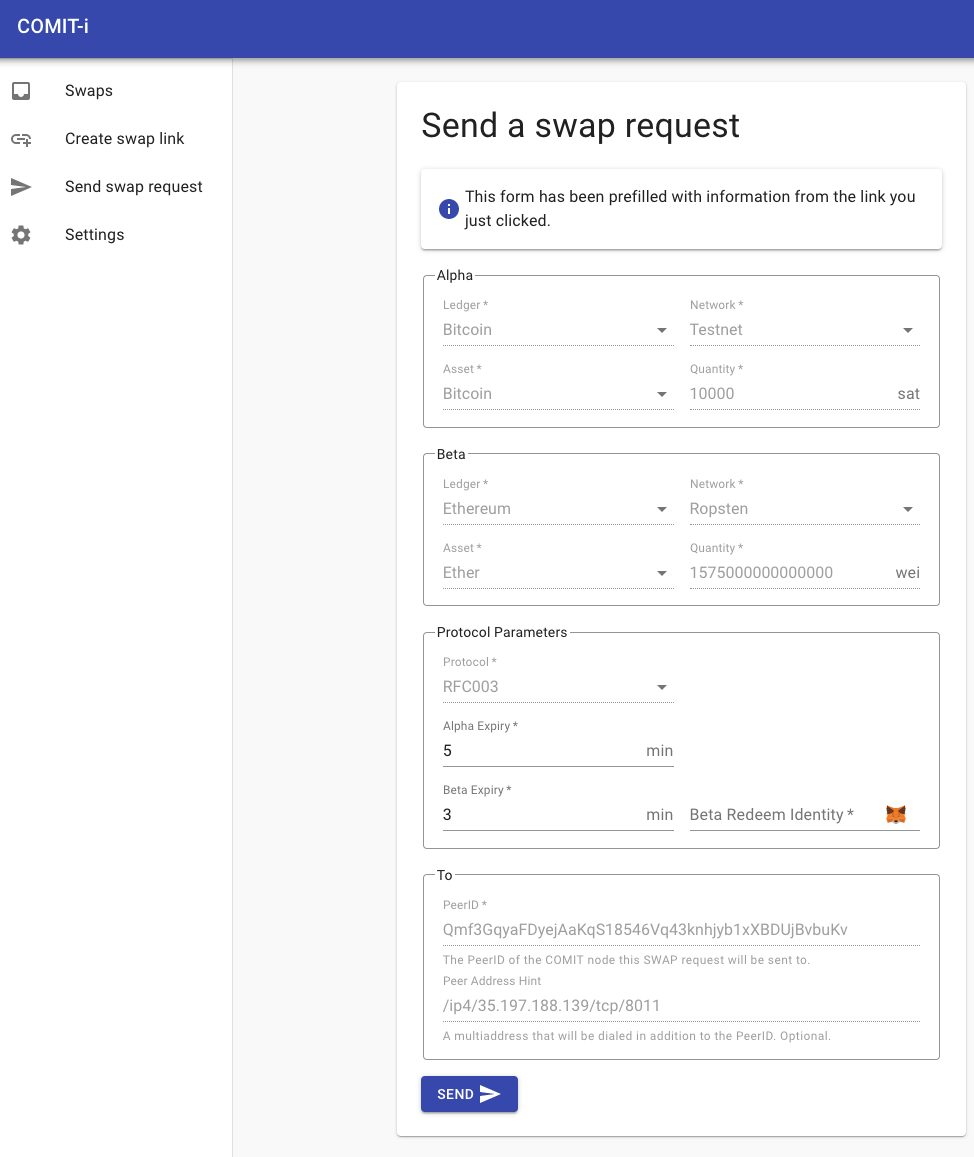
Depending on what currency you are swapping, you will need to provide additional addresses.
In the case of the screenshot, the swap is between Ether and Bitcoin, i.e. you will give (sell) Bitcoin and will receive (buy) Ether.
When done, click on Send.
 ;
; - You will be redirected to the overview of pending swaps showing you your request:
 ;
; - You can click on the swap to get more details.
As soon as Bobtimus has accepted the request you can move forward with the funding action.
In our example, you will need to fund the Bitcoin HTLC.
Go ahead and fund it with your favorite wallet or use
btc-cli sendtoaddress <address> <amount>if you are running bitcoind in a docker container as described above.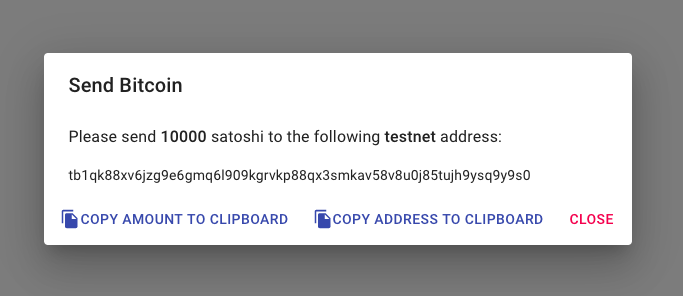 ;
; - Now you will need to wait until your transaction has been included in the Bitcoin blockchain. As soon as this happened, Bobtimus will follow up with funding the Ether HTLC.
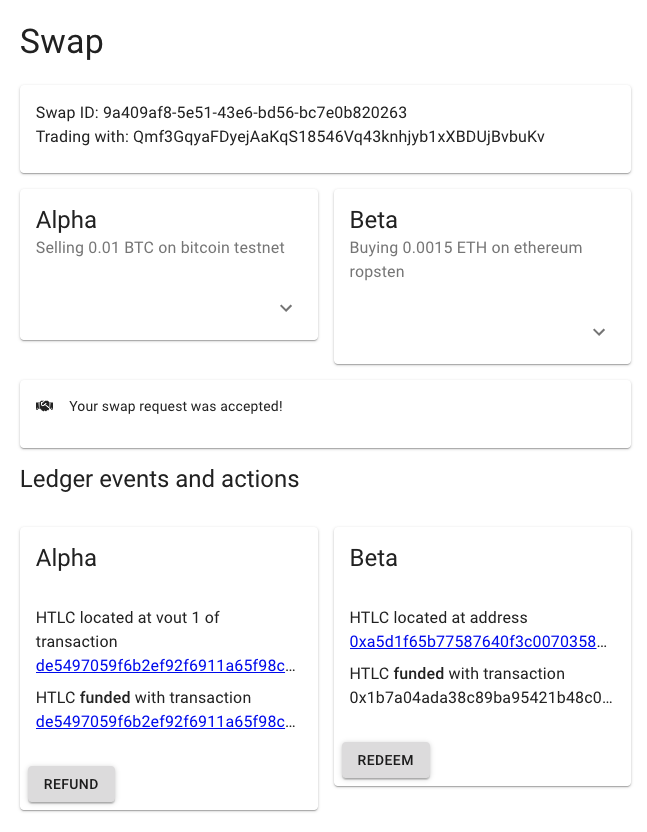 ;
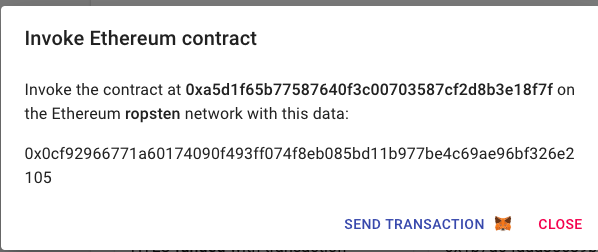
; - In the next step, you will need to redeem the Ether HTLC.
For that, click on the redeem button and you will be shown a dialog which allows you to send a transaction to the Ether HTLC with your secret.
As soon as your transaction has been confirmed, you will receive your Ether.
For you, there is no further action to be done.
 ;
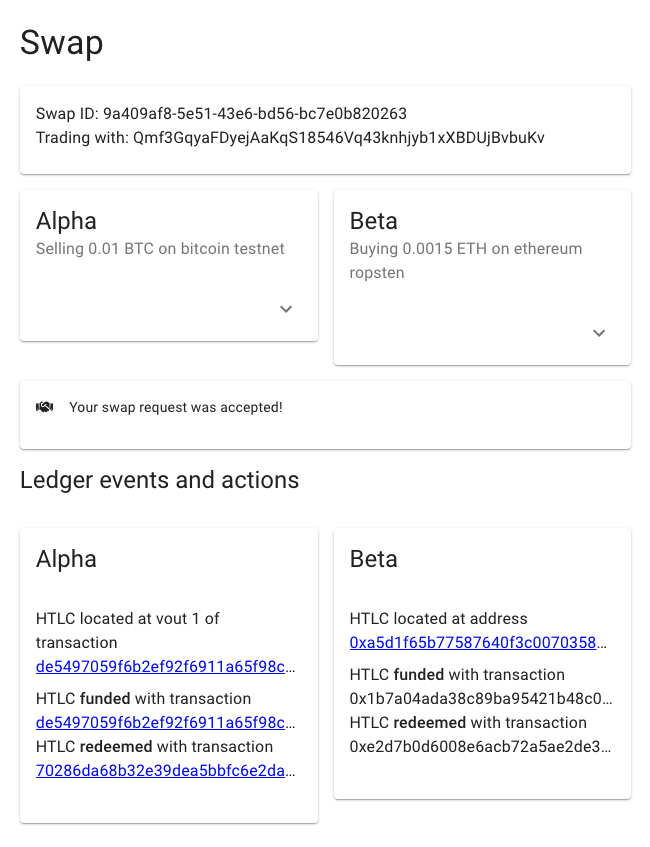
; - By redeeming the Ether HTLC you revealed your secret.
Bobtimus is able to now take his Bitcoin from the Bitcoin HTLC.
As soon as he has redeemed his part, i.e. he redeemed the Bitcoin HTLC, you will see the following:
 ;
;
Congratulations on that, feel free to play around with it and tell us how it goes in the comment section below or on twitter at: @comit_network.
Happy swapping,
Philipp & the whole CoBloX Team
Appendix
Bitcoind in a docker container
Parity in a docker container
You can follow the instructions from wiki.parity.io or use the command belwo: We assume you want to persist the blockchain data so that you don't have to resync between container restarts:
Start parity:
Verify that your parity node responds with: